KB 159001 - Some Basic Configuration on Proxmox
Delete VM on Proxmox
- Go to the server
- Select the VM which you want to delete
- Select the more option (Shown in picture)
- Click on the Remove
- Provide the VM ID number
- Click on Remove button, VM will be delete from server
Create a Template
- Go to the server
- Right click on VM from which you want create template
- Select "Convert to template" option
- Provide the confirmation by clicking on "Yes" button. Template will be created.
Create a Clone
- Go to the Server
- Right click on template/VM from which you want to create clone
- Select "Clone" from the option
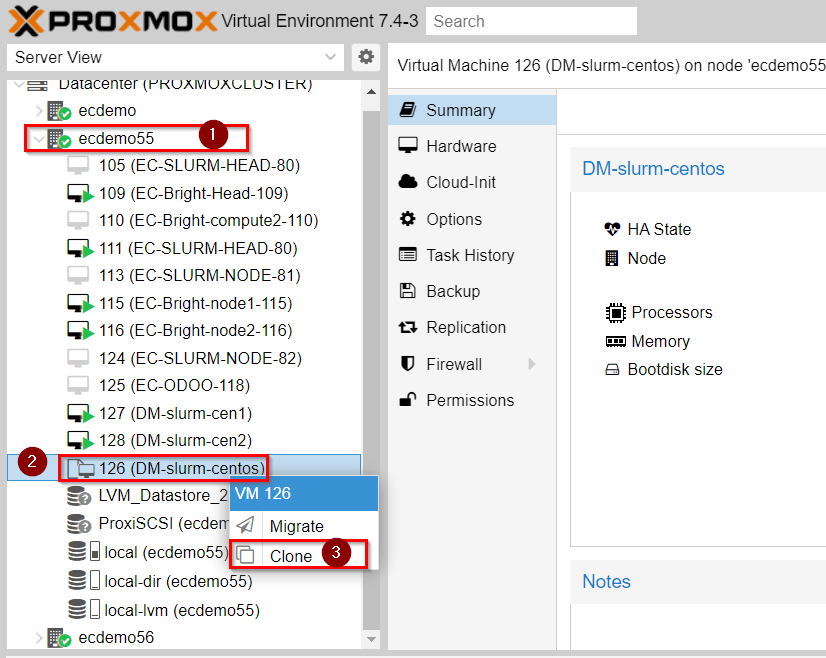
- There is 2 option to create clone
- Full Clone:- A full clone is an independent copy of a virtual machine that shares nothing with the parent virtual machine after the cloning operation. Ongoing operation of a full clone is separate from the parent virtual machine
- Linked Clone:- A linked clone is a copy of a virtual machine that shares virtual disks with the parent virtual machine in an ongoing manner. A linked clone is a fast way to convert and run a new virtual machine
- Fill the "Clone VM" Dialog Box"
- like: VM ID, Name, Mode, Target Storage
- Click on Clone, Clone VM will be create
Add/Remove Hardware in an Existing VM
- Go to the server
- Select VM, in which you want to add/remove hardware
- Click on Add for additional hardware
- Add additional Hard Disk
- Click on Hard Disk
- Select you available storage in the server
- Provide the Disk Capacity
- Click on "Add" button, additional Hard Disk will created
- Add additional Network Interface
- Click on Network Device
- Select the available network in the server
- Click on "Add" button, additional Network will created
- Remove a Hard Disk
- Select the Hard Disk from the list, which you want to remove
- Click on "Detach" button
- Provide the confirmation by clinking "yes", Hard Disk will deleted
- Remove a Network Interface
- Select the Network from the list, which you want to remove
- Click on "Remove" button
- Provide the confirmation by clinking "yes", Network will deleted
Create a Snapshots of a VM
- Go to the server
- Select the VM
- Select the "Snapshots" in right pane
- Click on "Take Snapshot" button
- Provide the snapshot name and description
- Click on "Take Snapshot"
- Snapshot will created
- To Rollback a Snapshot
- Select the snapshot which you want to rollback
- Click on "Rollback" button
- Provide the confirmation by clicking "Yes"
- Remove the Snapshot
- Select the snapshot which you want to delete
- Click on "" button
- Provide the confirmation by clicking "Yes"
Related Articles
KB 471509 - Installing Cumulus VX on Proxmox VE
This document describes how to deploy NVIDIA Cumulus VX (Cumulus Linux 5.x) on Proxmox VE using the QCOW2 disk image provided by NVIDIA. Cumulus VX allows you to simulate a Cumulus Linux switch using KVM. 1. Requirements Item Details Hypervisor ...
KB 187001 - Container on Proxmox
Upload Container Template on Proxmox Storage Go to the server Select storage in which you want upload template Go to "CT Templates" tab Click on "Templates" button Search for Templates You can search any kind of Linux flavour Select Package and click ...
KB 461110 - Create VM on Proxmox.
Steps to create VM. Login to Proxmox account with credentials. In home screen Top Right click on "create VM". Here create: Virtual Machine wizard is appear. Select the server in which you want to create VM. VM ID is auto-generated. Provide any name ...
KB 483001 - Upload ISO file on Proxmox
How to Upload Operating System ISO file on Proxmox Steps to upload ISO file Go to the web browser and login to proxmox account using credential's Select the server in which ISO should be upload Select the storage location in which ISO should be ...
KB 470118 - Troubleshooting on Server Network Speed
Steps to troubleshoot speed on server for 10G NIC Verify Network Configuration Network Adapter Settings: Check the settings of the Intel® Dual Port X710-T2L 10-Gigabit Ethernet Network Adapter on each server. Ensure that the adapter is configured for ...
Recent Articles
KB-630208 | How to use Find and Locate to search for files in Linux
Purpose To provide Linux administrators and Field Engineers with guidance on using the find and locate utilities to efficiently search for files and directories within a Linux filesystem based on criteria such as name, type, size, timestamps, ...
KB-630164 | How to use rsync to Synchronize Files
Purpose To provide a clear and practical procedure for using the rsync utility to synchronize files and directories between local systems and remote hosts, including push and pull operations, while preserving file attributes and optimizing data ...
KB-630107 | How to create a Linux swap file
Purpose To provide Field Engineers and Linux administrators with a standardized procedure for creating, configuring, and validating a Linux swap file. This procedure helps ensure sufficient virtual memory is available when physical RAM is exhausted ...
MSI All-in-One (AIO) PC – Physical Damage Policy for Warranty Claims
MSI All-in-One (AIO) PC – Physical Damage Policy for Warranty Claims MSI's standard warranty does not cover physical or accidental damage to an All-in-One (AIO) PC. If the damage is determined to be caused by external factors rather than a ...
KB 134833 - Troubleshooting NVSM Alert NV-CPU-XX – Unrecoverable CPU Internal Error
Purpose This document provides a general troubleshooting procedure for the NVIDIA System Management (NVSM) alert NV-CPU-XX, which indicates that a CPU has reported an internal error. The article outlines how to verify whether the alert represents an ...
Popular Articles
CP Plus Camera and NVR Configuration
NVR Configuration The CP Plus Pro Series of NVRs have been meticulously designed for providing you with upgraded performance and higher recording quality in your IP video surveillance solution. The robust processor that has been inculcated in this ...
KB 775235 - Kerberos Authentication – Overview
What is Kerberos? Kerberos is a secure authentication method used in our Active Directory (AD) environment (mbuzztech.com). It allows users to: Access multiple systems without re-entering passwords (Single Sign-On – SSO) Log in once Where We Use It ...
How to Remove and Reinstall NVIDIA Drivers on Ubuntu
This article provides step by step guide to completely remove existing NVIDIA drivers and reinstall specific version of the NVIDIA driver on the Ubuntu system Prerequisites Administrative (sudo) access to the Ubuntu system. Internet access to ...
KB 692001 - Personal Computers and Servers - Classification and Point of Contact
We can classify the computers that MBUZZ handles based on their form-factor as below: Tower Workstations, Desktops, Gaming PCs and SFF (Small form factor) PCs fall under this category. These are computers people would use on a desk and rarely move. ...
KB 298031 - M.2 SSD Tier List
The sequential read and write speeds, which are usually the most advertised number, are not a proper benchmark of real-world performance or the quality of an SSD. This article categorizes and tiers SSDs based on factors like the type of NAND flash, ...