Intel VROC Installation and RAID Creation on ASUS Server
Intel VROC Installation and RAID Creation on ASUS Server
Intel Virtual RAID on CPU, or Intel VROC, is a hybrid RAID storage solution for NVMe solid-state drives (SSDs) that connects directly to Intel Xeon Scalable Processors using the PCIe expansion connection. Intel® Virtual RAID on CPU (Intel® VROC) is an enterprise RAID solution that maximizes the performance of NVMe* SSDs. Intel® VROC is supported via a feature in Intel® Xeon® Scalable processors known as the Intel® Volume Management Device (Intel® VMD), which is an integrated controller located within the CPU's PCIe root complex.

Intel® VROC Is a Complete RAID Solution, Including:
- High performance due to direct connect of SSDs
- Platform integrated storage controller functions provided by Intel® VMD
- Boot and Data RAID
- Scalable to many devices and RAID arrays
- Support for SATA and NVMe RAID arrays
VROC Hardware Installation
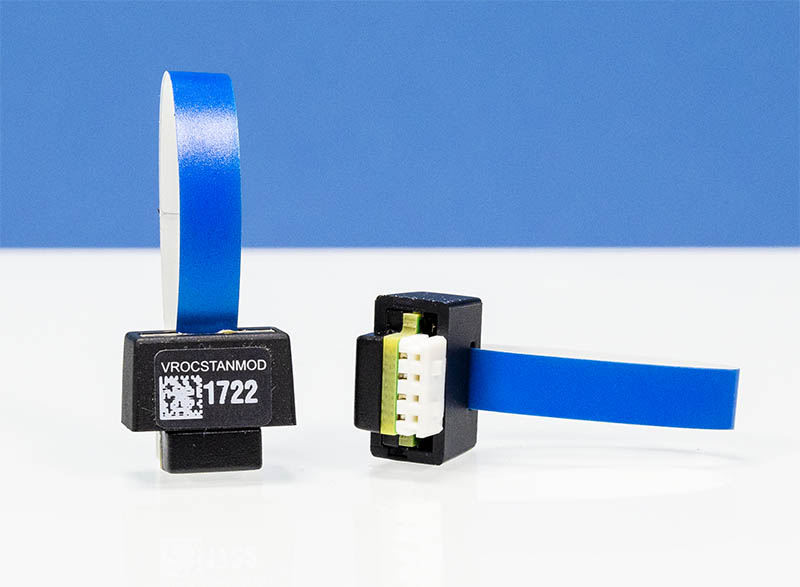
For to create Raid on NVMe SSD’s, Intel VROC hardware key
must be inserted on the motherboard, without the intel VROC hardware key RAID 0
will be available.Server Model- RS700-E10-RS4U
VROC Module Part Number: VROCSTANMODDescription: Intel VROC Standard Raid Hardware Key
To open the cover, remove the screws on the sides and slide
it.
·

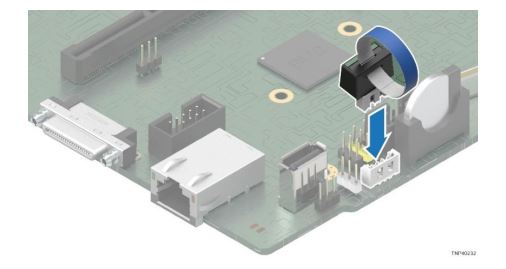
Connect/plug the VROC Key into the motherboard.
Once the installation is finished, close the server and switch it on, enabling the VROC on the BIOS.
Enabling VROC in BIOS
To access BIOS, Press DEL or F2 Key
Once grand the access to BIOS, Go to Advance settings, Disable the secure boot
if its enabled
From the IIO configuration, Select
Intel VMD Technology
From intel VMD technology,
select intel VMD for Volume management device on
Socket1 and enter
From the tab, select and enable VMD
config for IOU3 and 4
Once its enabled, Save and Exit the BIOS by pressing F10
and start creating Raid
Creating RAID in VROC
Once the server Restart, enter into bios and confirm the
NVMe M.2 SSDs and intel® Virtual RAID ON CPU options
are visible.
Select All intel VMD
Controllers
Once you enter the tab, it will display all the
available drives to create RAID
To create RAID, Go to Create
RAID Volume
Select a NAME for RAID Volume
Select the RAID level (RAID 1 or RAID 0)
Select Disks by pressing Space bar on Keyboard
View and verify the available storages, then press create volume tab to create the RAID. Then select yes
to confirm.
· After successfully configuring the Raid, exit the BIOS and install the OS.
· VROC driver installation might required, for the OS to detect the created RAID volume.
· Driver Download Link
For additional information on VROC, please refer the link
Related Articles
M.2 drives not detecting after VROC install on ASUS server
Issue: M.2 drives not detecting on ASUS Server Cause: VROC doesn’t work if CSM mode enabled. Also Broadcom menu item will disappear if CSM mode enabled (Broadcom BIOS will use legacy tool for RAID creation). Solution: Re-flashed the BIOS ...The customer is not able to configure the RAID on supermicro Server.
Issues: Unable to find the option to configure RAID on the NVMe drives. Model No.: SYS-220BT-HNTR AS-1125HS-TNR Solution: 1) Server Model: 1125HS-TNR It is AMD system, it does not support NVME raid nor VROC key. It only has SAS hard drive raid with ...ASUS Server Stress Testing Guide for INTEL and AMD Platforms
Creating a Bootable USB with Asus Test Tool Step 1: Download Required Files Download Asus Linux Image: Save the Linux image file provided by Asus. Download Memtest Tool: Open a browser, search for "Memtest," and download the free version from the ...Ubuntu Server 22.04 Installation Hangs on ASUS WRX80e-SAGE Series
During the installation of Ubuntu Server 22.04 on ASUS WRX80E-SAGE series motherboards, the installation process hangs during the boot phase. The issue is associated with USB disk recognition errors, particularly with devices managed by the XHCI ...ASUS Server ESC-N4A-E11 - Expansion Card Installation
Server Rear Panel Features The expansion slots, system power socket, liquid cooler connectors (on selected models) are located on the rear panel of the server. The right part includes the I/O shield with openings for the rear panel connectors on the ...